ใช้งาน LINE Notify Service
LINE Notify มีรูปแบบบริการ 2 แบบหลักๆ แบบแรกจะเป็นลักษณะการใช้งานแบบส่วนตัว โดยการไปขอ access_token จาก LINE Platform ซึ่งมีความหมายว่า เราเป็นผู้อนุญาตตัวเราเอง ให้ตัวเราเองสามารถส่ง Notification ถึงตัวเราเองได้ โดยทุกครั้งที่ส่ง Notification จะต้องใช้ access_token ซึ่งเป็นเสมือนบัตรผ่านยืนยันการได้รับอนุญาตดังกล่าว
บทความนี้จะเป็นนำเสนอ LINE Notify ในแบบที่ 2 หรือ เรียกว่าแบบ LINE Notify Service ตัวอย่างการนำไปประยุกต์ใช้งาน เช่น สมมุติเรามี Website ที่อยากให้มีความสามารถ ในการแจ้งข้อมูลการจัดส่งสินค้าให้ลูกค้าทราบในทุกขั้นตอนของการจัดส่งสินค้า กรณีนี้เราสามารถนำ LINE Notify Service มา Integrate กับระบบ Order Tracking ของเราเพื่อใช้ส่ง Notification ให้กับลูกค้าได้

การใช้งาน LINE Notify Service ผู้ส่ง Notification คือระบบของเรา แต่ผู้รับ Notification คือลูกค้า (บุคคลอื่น) ดังนั้นการได้มาซึ่ง access_token นั้นจะต้องเป็นการได้รับอนุญาต จากผู้รับ (ลูกค้า) Notication เป็นรายบุคคลเสียก่อน
เพื่อความเข้าใจตรงกัน การส่ง Notification ของ LINE Notify ทั้ง 2 แบบนั้น ไม่สามารถส่งตรงๆ ถึงผู้รับ (User บน LINE Platform) ได้ ดังนั้นการส่ง Notification ของ LINE Notify จะเป็นการส่งผ่านเพื่อนของผู้รับที่ชื่อว่าคุณ LINE Notify เท่านั้น และหากกลุ่มบน LINE Platform มีคุณ LINE Notify เป็นสมาชิกในกลุ่ม กลุ่มก็จะได้รับ Notification ด้วยเช่นกัน
ขั้นตอนในการ Implement LINE Notify Service
- ผู้ส่งใช้บัญชี LINE Developer สร้าง Service ซึ่งสามารถที่จะสร้าง Service ขึ้นมากี่ตัวก็ได้
- Website จะต้องมีลิงค์เพื่อ Redirect ไปยังระบบ Authentication ของ LINE Platform ที่จะใช้ในการให้ผู้รับอนุญาตให้ Service ของเราสามารถส่ง Notification ให้กับผู้รับได้
- โปรแกรม PHP เพื่อใช้รอรับ Callback จาก LINE โดยในขั้นตอนนี้ทาง LINE จะให้
codeหรือ อาจจะเรียกว่าrefresh tokenตามหลักการของOAuth2 - โปรแกรม PHP เพื่อใช้ส่ง
codeไปยัง LINE Platform เพื่อเป็นการขอรับaccess_token - โปรแกรม PHP เพื่อใช้ส่ง Notification โดยใช้
access_tokenเสมือนเป็นตั๋วยืนยันการได้รับอนุญาต ซึ่งเราก็สามารถส่ง Notification ให้กับผู้รับคนนั้นได้เรื่อยๆ (ผ่าน LINE Notify) จนกว่าaccess_tokenจะถูกยกเลิก หรือ หมดอายุ
ผู้รับจะต้องเพิ่มเพื่อนชื่อคุณ LINE Notify ให้กับบัญชี LINE ของตัวเองเพื่อรับข้อความ
เพื่อนคนใหม่ชื่อคุณ LINE Notify

การเพิ่มเพื่อนที่ชื่อคุณ LINE Notify เป็น Requirement ที่ขาดไม่ได้ในการใช้บริการ LINE Notify
สร้าง Service เพื่อใช้กับ LINE Notify
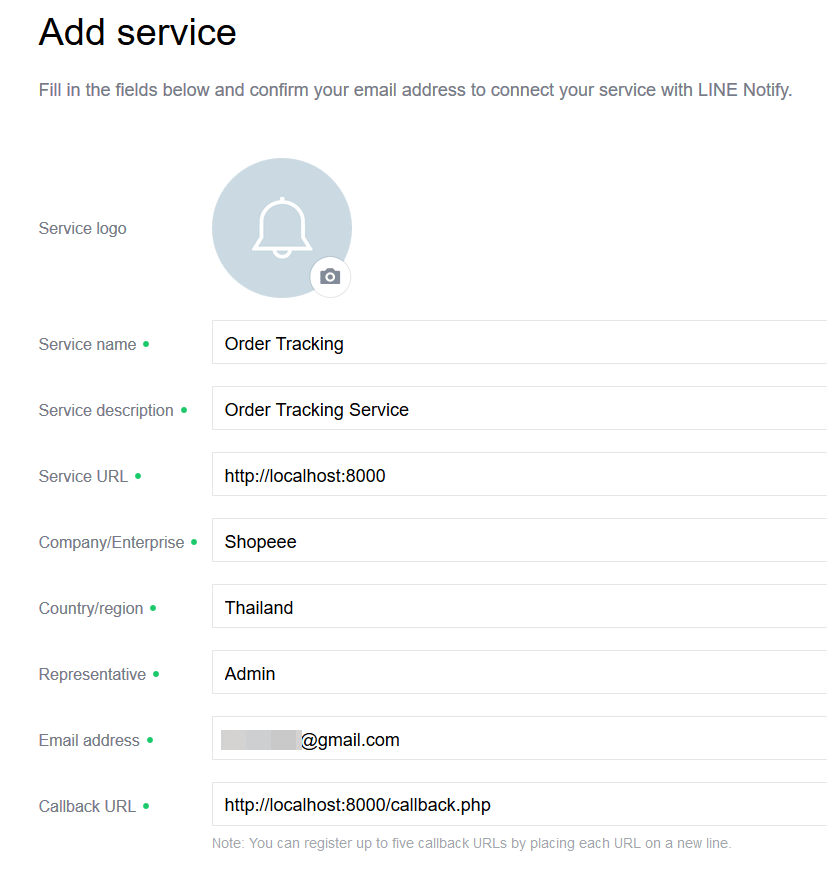
ขั้นตอนการขออนุญาตจากผู้รับ
ในขั้นตอนนี้เราจะต้องสร้างลิงค์สำหรับ Redirect ไปยังระบบของ LINE Platform
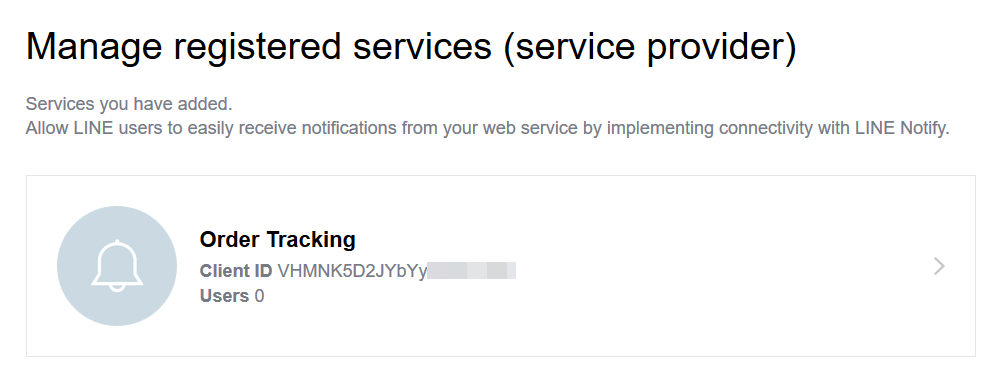
ในขั้นตอนนี้จะต้องมีการใช้งาน Client ID ซึ่งดูได้จาก หน้าจอ Manage Registered Service และ ข้อมูล Parameter ที่ใช้ในการส่ง Request สามารถดูได้จาก LINE Notify API Document
ไฟล์ register.php
<?php

define('CLIENT_ID', 'VHMNK5D2JYbYyGlJH...');
define('LINE_API_URI', 'https://notify-bot.line.me/oauth/authorize?');
define('CALLBACK_URI', 'http://localhost:8000/callback.php');

$queryStrings = [
    'response_type' => 'code',
    'client_id' => CLIENT_ID,
    'redirect_uri' => CALLBACK_URI,
    'scope' => 'notify',
    'state' => 'abcdef123456'
];

$queryString = LINE_API_URI . http_build_query($queryStrings);

?>

<a href="<?php echo $queryString; ?>">Register</a>
พิมพ์คำสั่งที่ Terminal
php -S localhost:8000
Start PHP Built-in Web Server ที่ Root Path ของโปรเจค
Browser
http://localhost:8000/register.php
กรณีไม่มีข้อผิดพลาดเกิดขึ้น ผู้ขอรับ Notification จะถูก Redirect ไปยังระบบ Authentication หลังจาก Click ลิงค์
Register
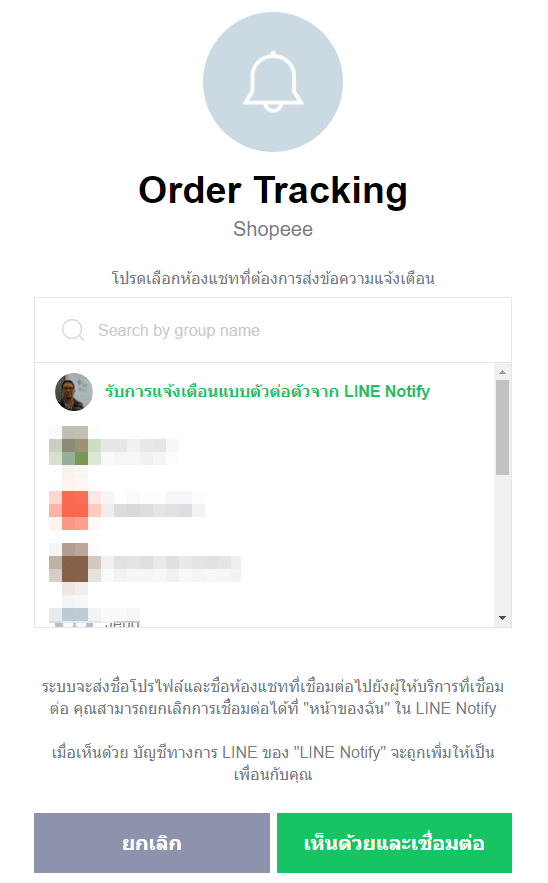
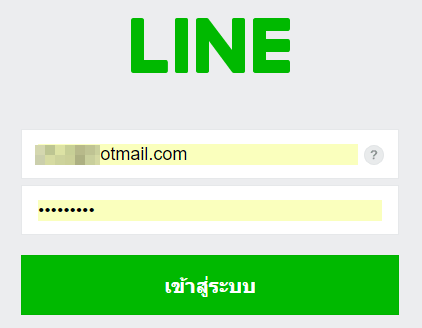
หลังจากผ่านขั้นตอนการ Authentication ผู้รับจะเป็นผู้เลือกว่าจะรับ Notification แบบส่วนตัว หรือ แบบกลุ่ม
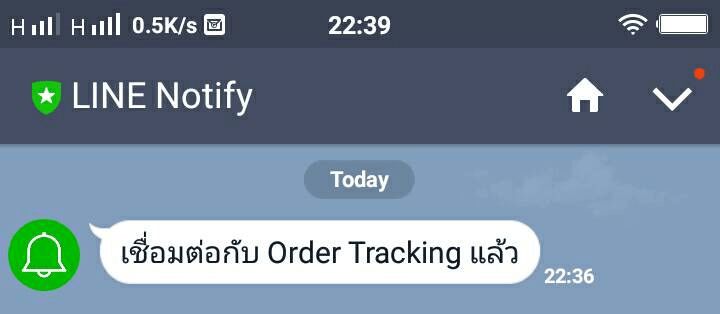
LINE Platform ส่ง Notification ให้กับผู้รับเพื่อเป็นการยืนยันว่าผู้รับได้อนุญาตให้ Service สามารถส่ง Notification หาผู้รับได้
ขั้นตอนการทดสอบ Callback
หลังจบขั้นตอนการ Authentication แล้ว LINE Platform จะทำการ Redirect กลับมายัง URI ที่เราได้ระบุไว้ตอนสร้าง Service
callback.php
<?php

parse_str($_SERVER['QUERY_STRING'], $queries);

var_dump($queries);
Result
array (size=2)
  'code' => string 'RMcGvWMuTS9JbLpBPWLYTk' (length=22)
  'state' => string 'abcdef123456' (length=12)
codeและstateถูกส่งแบบ Query String พร้อมกับ Callback
ใช้งาน Postman
ในขั้นตอนการทดสอบ เราสามารถนำ code มาขอรับ access_token โดยการใช้ Postman แทนการเขียนโปรแกรม
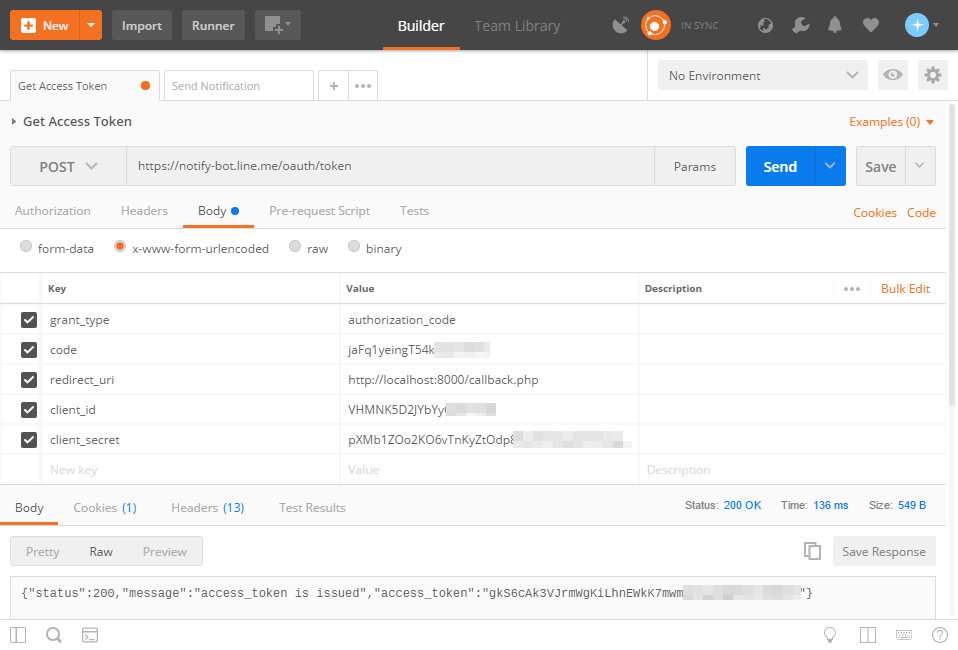
access_tokenจาก LINE Platform

codeเดิมที่เคยใช้ไปแล้วไม่สามารถนำมาขอaccess_tokenได้อีก
ขั้นตอนการขอ access_token
ในขั้นตอนนี้เราจะแก้ไขไฟล์ callback.php เพิ่มเติมเพื่อส่ง Request ไปขอ access_token แทนการใช้ Postman
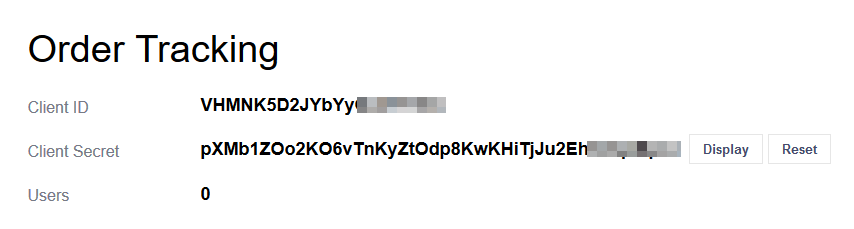
ในขั้นตอนนี้จะต้องมีการใช้งาน Client ID และ Client Secret ซึ่งดูได้จาก หน้าจอ Manage Registered Service และ ข้อมูล Parameter ที่ใช้ในการส่ง Request สามารถดูได้จาก LINE Notify API Document
ในการใช้งานจริงเราควรจัดเก็บ
access_tokenในระบบฐานข้อมูล โดยจัดเก็บคู่กับ ID, email และอื่นๆของผู้รับ
ไฟล์ callback.php
<?php

define('CLIENT_ID', 'VHMNK5D2JYbYyGlJH...');
define('CLIENT_SECRET', 'pXMb1ZOo2KO6vTnKyZtOdp8KwKHiTjJu2EhXGq...');
define('LINE_API_URI', 'https://notify-bot.line.me/oauth/token');
define('CALLBACK_URI', 'http://localhost:8000/callback.php');

parse_str($_SERVER['QUERY_STRING'], $queries);

$fields = [
    'grant_type' => 'authorization_code',
    'code' => $queries['code'],
    'redirect_uri' => CALLBACK_URI,
    'client_id' => CLIENT_ID,
    'client_secret' => CLIENT_SECRET
];

try {
    $ch = curl_init();

    curl_setopt($ch, CURLOPT_URL, LINE_API_URI);
    curl_setopt($ch, CURLOPT_POST, count($fields));
    curl_setopt($ch, CURLOPT_POSTFIELDS, $fields);
    curl_setopt($ch, CURLOPT_RETURNTRANSFER, true);
    curl_setopt($ch, CURLOPT_SSL_VERIFYPEER, false);

    $res = curl_exec($ch);
    curl_close($ch);

    if ($res == false)
        throw new Exception(curl_error($ch), curl_errno($ch));

    $json = json_decode($res);

    var_dump($json);
} catch(Exception $e) {
    var_dump($e);
}
Result
object(stdClass)[1]
  public 'status' => int 200
  public 'message' => string 'access_token is issued' (length=22)
  public 'access_token' => string 'P0ku2DjIlLItSPfQhCOtNj0OJpEA7qOLH2YfaC...' (length=43)
access_tokenจาก LINE Platform เพื่อนำไปใช้ในการส่ง Notification ให้กับผู้รับต่อไป
ขั้นตอนการส่ง Notification
ในขั้นตอนนี้เราจะทำการเขียนโปรแกรม เพื่อส่ง Notification ไปยังผู้รับ ซึ่งเราสามารถส่ง Notification ให้กับผู้รับได้เรื่อยๆ จนกว่า access_token จะถูกยกเลิก หรือ หมดอายุ
ข้อมูล Parameter ที่ใช้ในการส่ง Request สามารถดูได้จาก LINE Notify API Document
ไฟล์ notify.php
<?php

define('ACCESS_TOKEN', 'P0ku2DjIlLItSPfQhCOtNj0OJpEA7qOLH2YfaC...');
define('LINE_API_URI', 'https://notify-api.line.me/api/notify');

$headers = [
    'Authorization: Bearer ' . ACCESS_TOKEN
];
$fields = [
    'message' => 'Your order #12345 has been delivered'
];

try {
    $ch = curl_init();

    curl_setopt($ch, CURLOPT_URL, LINE_API_URI);
    curl_setopt($ch, CURLOPT_HTTPHEADER, $headers);
    curl_setopt($ch, CURLOPT_POST, count($fields));
    curl_setopt($ch, CURLOPT_POSTFIELDS, $fields);
    curl_setopt($ch, CURLOPT_RETURNTRANSFER, true);
    curl_setopt($ch, CURLOPT_SSL_VERIFYPEER, false);

    $res = curl_exec($ch);
    curl_close($ch);

    if ($res == false)
        throw new Exception(curl_error($ch), curl_errno($ch));

    $json = json_decode($res);
    $status = $json->status;

    var_dump($status);
} catch (Exception $e) {
    var_dump($e);
}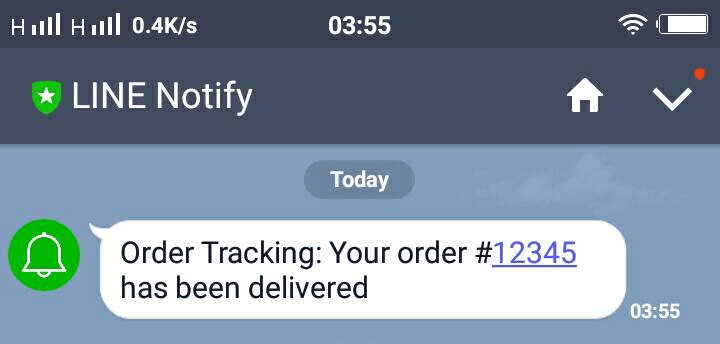
ผู้รับได้รับ Notification จาก Service เป็นที่เรียบร้อย